
During the final days of 2020, I embarked on a project to run (up to) 100 miles on Mount Diablo. Mount Diablo is a mountain of the Diablo Range (elevation 3,849′) in Contra Costa County, east of the San Francisco Bay Area in Northern California. It has a network of 162 miles of gorgeous trails throughout almost 20,000 acres of Mount Diablo State Park. It also happens to be in my backyard.
When the adult ICU capacity dropped below 15% in the San Francisco Bay Area on 12/15/20, the Regional Stay Home Order was triggered. Under the order, residents were required to “stay at home as much as possible and to stop mixing between households that can lead to COVID-19 spread”. Fortunately, outdoor recreation was allowed “to promote and protect the physical and mental well-being of people in California”. In keeping with the spirit of the order, I chose to stay local and explore my backyard trails solo during my Christmas holiday break.
In a moment of inspiration (or folly?), I thought I would summit Mount Diablo as many times as I could, via different routes and covering as many unique trails as possible. It sounded good at the time.
This is a story of my first summit of this 100-mile adventure.
Preparation is key
Here are a few things I recommend to prepare for this adventure:
- Plan your route. Consult a trail map or online trail app to plan your route, and have it with you during the hike/run. Download your online map as cell signal can get spotty on the mountain. The Mount Diablo trails are well-marked, but it’s easy to get turned around. I recommend the following resources:

- Water and calories. I cannot overstate the importance of staying hydrated and fueled on challenging activities like this. There are very few places to refill water bottles between the base and the Summit, so plan to have enough fluids for the entire climb. Do not drink from streams, springs, or animal troughs unless you have a water filter. Given the current water shortage, however, visitors are encouraged to bring their own supply during their visit. On a typical summit run, I pack 1-1.5 liters of fluids (with and without electrolytes). Also, bring enough calories so you can have a steady source of energy (e.g. energy gels and/or bars, fruit, chips, peanut butter sandwich, etc). I try to eat 100-150 calories per hour. But please remember to pack out your trash.
- Bring proper gear.
- Wear shoes with good grip (e.g., trail shoes rather than road shoes). Mount Diablo trails can be technical and loose, especially during the dry season, or wet and muddy in the winter. Good grip improves your chance of staying upright.
- Bring protective layers. Check the weather and plan accordingly. The weather near and at the Summit can be very different than the weather at the base. A hat and sunscreen are recommended in the summer. Rain and cold gear may be needed in the winter.
- Trekking poles are optional, but helpful on steep, technical terrain.
- First aid kit. Mine includes baby wipes, Band-Aids, hand warmers, a thermal blanket, lip balm, sunscreen, contact lens solution, anti-chafing salve, Advil, Benadryl, and Pepto-Bismol.
- Stay safe. Stick to established trails, not only for safety reasons but also to protect the ecology. Some of the things to watch out for on Mount Diablo — ticks, poison oak, rattlesnakes (especially in the summer), and the rare mountain lion. Know what to do if you encounter any of these.
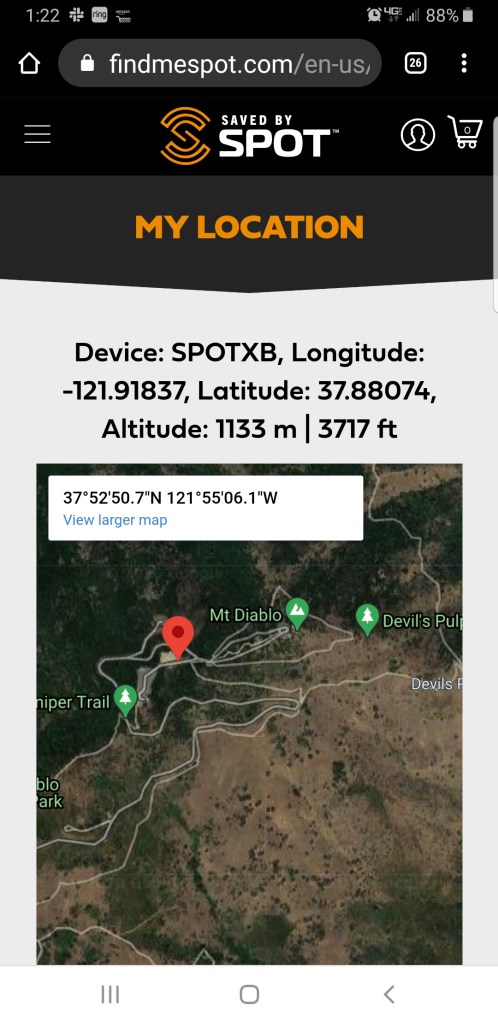
- Communication device. Cell phone service is available typically at the trailheads, campgrounds, and Summit, but spotty elsewhere. To give myself and my family peace of mind, especially on solo adventures, I invested in a Spot X 2-way Satellite Messenger, which allows me to communicate with my contacts when outside of cellular coverage, and more importantly, send out an S.O.S. signal should I require emergency assistance.
Getting to the start: Mitchell Canyon Staging Area
This route starts and ends at the Mitchell Canyon Staging Area located in Mount Diablo State Park at the south end of Mitchell Canyon Road in Clayton, CA.
Amenities. There are flush toilets and running water in the restrooms, a spigot outside the restrooms, picnic tables, and a visitor center staffed by State Park volunteers. Normally, the visitor center is open on the weekends (Mar-Oct, 8am-4pm; Nov-Feb, 9am-3pm), but due to the pandemic and Stay Home Orders currently in place, the visitor center is closed.
Parking. The park gates open at 8am and close at sunset (i.e., the entrance gate is closed by sunset, but you can still exit the park for a little while after sunset). There is a vehicle entrance fee of $6 (cash/check only) that you pay upon entrance (self service). If you have a valid California Parks annual day use pass (e.g., California Explorer Annual Day Use Pass or Golden Poppy Annual Day Use Pass), then you don’t have to pay the entrance fee — just go ahead and display your pass on your dashboard.
And off we go…
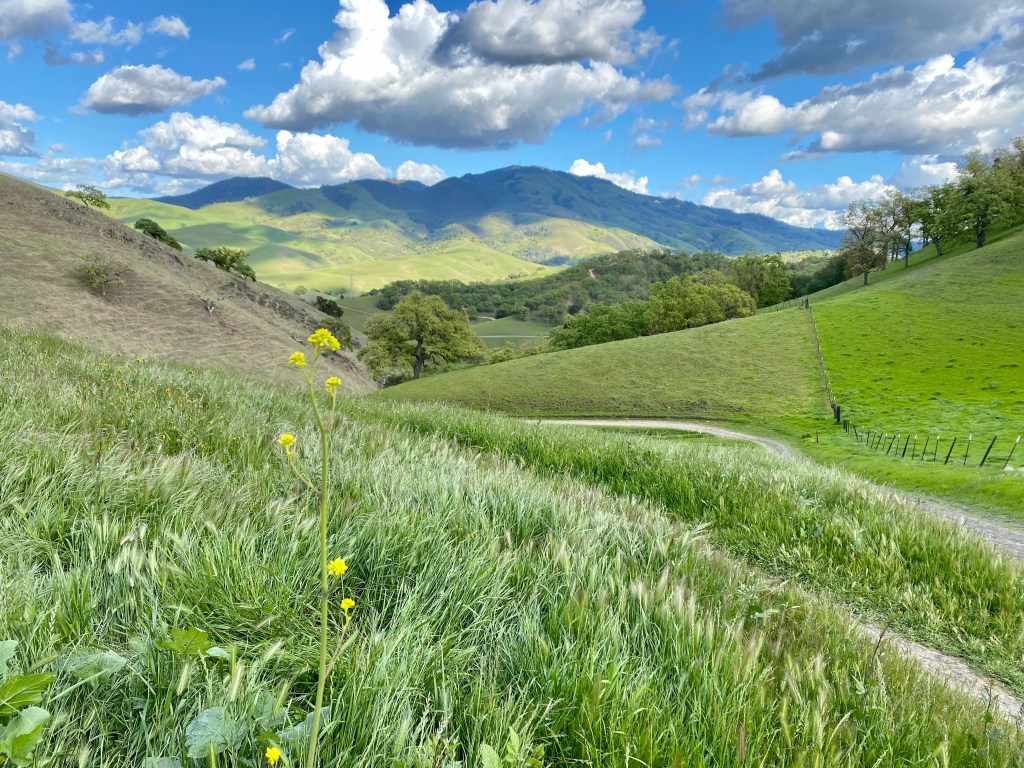
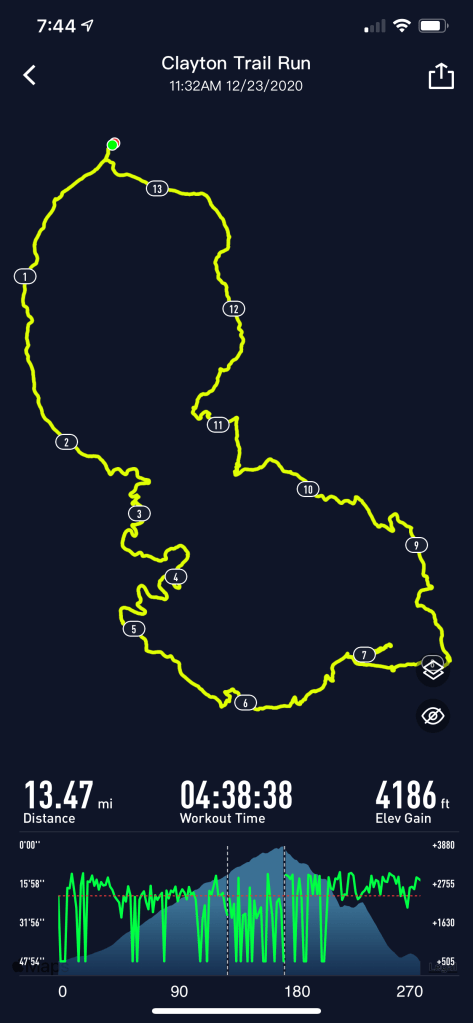
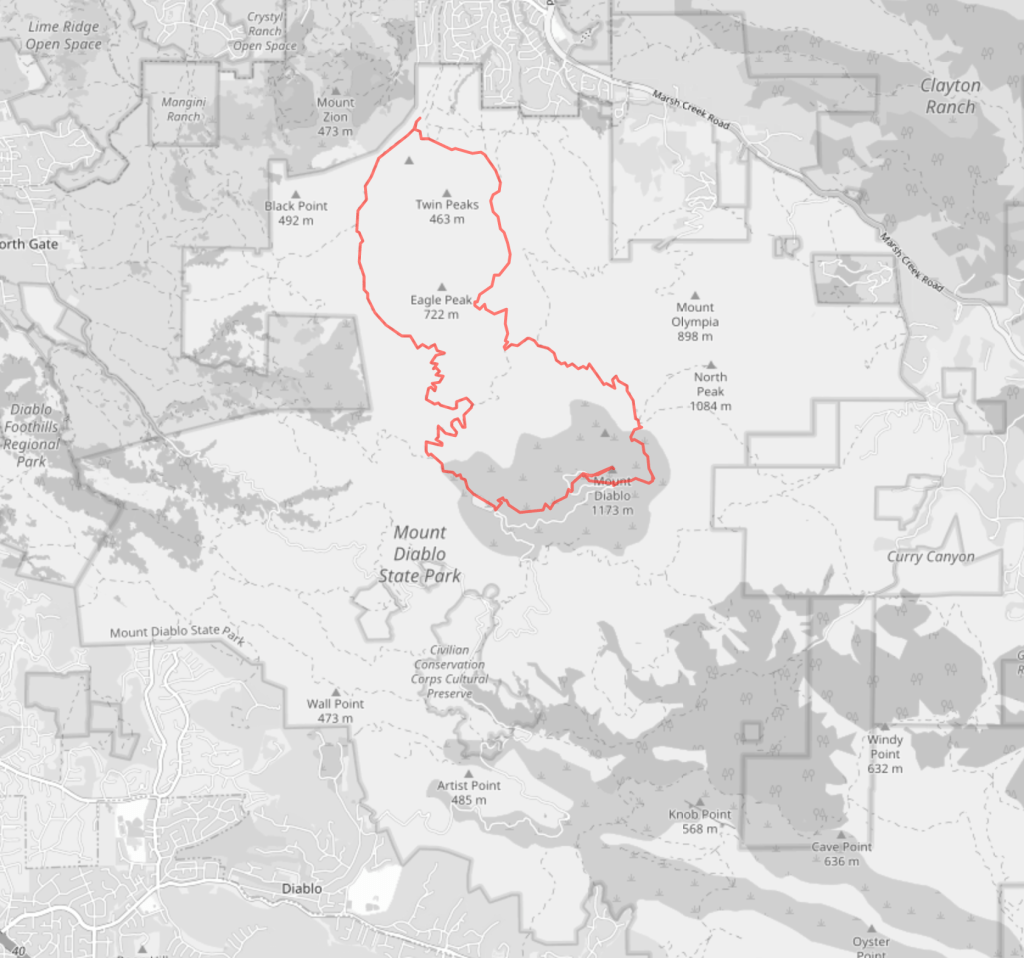
This is a 13.47-mile loop that starts and ends at the Mitchell Canyon Staging Area, with 4,186′ of elevation gain. It’s challenging, but very scenic and rewarding.
Start by heading south on Mitchell Canyon Rd, a smooth fire road that runs alongside Mitchell Creek. The first two miles are flat, a nice way to warm up the legs and lungs for the climb ahead. This stretch also provides opportunities for spotting different fungi (winter), ladybugs (spring), or tarantula (fall).
After Mile 2, you start a gradual ascent up a series of switchbacks on Mitchell Canyon Rd. Don’t forget to take in the view of Eagle Peak to your left.

Arrive at Deer Flat picnic area around Mile 3.7, a good spot for a quick snack with views of Eagle Peak, Bald Ridge, and Clayton. Continue south on Mitchell Canyon Rd and bear right at Deer Flat Rd, a smooth fire road, to head towards Juniper Campground. Along the way, enjoy the diverse native flora, including Coulter pine (Pinus coulteri), Gray pine (Pinus sabiniana), Toyon (Heteromeles arbutifolia), and Manzanita (Arctostaphylos). I have the Seek app by iNaturalist on my phone, which helps me identify plants and animals.
After climbing another set of switchbacks, arrive at Deer Flat Rd, which opens up to an amazing view of the East Bay, including Lamorinda, Berkeley, and the San Francisco Bay. This area is quite exposed to the elements, including strong gusty winds.

At the end of Deer Flat Rd is Juniper Campground (at Mile 5.6: 3,000′ elevation). Amenities include showers, flushing toilets, and faucets. However, due to the pandemic, the campground is closed, and because of a water shortage, these amenities are not available at the moment. Portable toilets are available.
Continue on the paved road through Juniper Campground and turn left on Juniper Trail (just before you reach Summit Rd). Juniper Trail is a single track, technical trail that climbs ~700 feet in ~1.3 miles. Trekking poles would be helpful on this stretch. Don’t forget to take breaks and enjoy views of the south, including Pleasanton Ridge and Alameda County. There is a big rock – a “Greenstone”, one of the oldest rocks on Mount Diablo, ranging between 90 to 190 million years old – on Juniper Trail that’s perfect for stopping and taking in the views.
At Mile 6.6, cross Summit Rd — watch out for cars and bikes from both directions! After another half mile, you’ll emerge at the Lower Summit Parking Lot — you’re almost there! Follow Summit Rd all the way to the Summit, or better yet, take the short Summit Trail detour and arrive at the Summit (Mile 7.2; 3,849′ elevation). This section is short but feels magical – as if you’re in an enchanted forest.

The Summit Visitor Center is located in the historic building at the top of Mount Diablo’s highest peak. It was built in the late 1930s by the California Conservation Corps using fossiliferous sandstone quarried from Rock City. Remnants of ancient fossils can be found on the building. Inside the Visitor Center are exhibits that feature the cultural and natural history of the park, including an impressive diorama and model of the mountain. Park aides, including my friend Bruce, man the gift shop, from which I would always buy my Coke and snacks — my reward for climbing the mountain. Unfortunately, the Visitor Center is closed at this time.

Above the Visitor Center is an observation deck that provides a 360-degree view.
“Summer days are sometimes hazy, and the best viewing is often on the day after a winter storm. Then, you can look to the west, beyond the Golden Gate Bridge to the Farallon Islands; southeast to the James Lick Observatory on Mount Hamilton at 4,213 feet elevation; south to Mount Loma Prieta in the Santa Cruz Mountains at 3,791 feet elevation; north to Mount Saint Helena in the Coast Range at 4,344 feet elevation; and much farther, Mount Lassen in the Cascades at 10,466 feet. To the north the San Joaquin and Sacramento rivers meet to form the twisting waterways of the Delta, and across the Central Valley the crest of the Sierra Nevada seems to float in space.”
– Mount Diablo Interpretive Association
At the top of the tower is a beacon, historically important to aviators and now lit once a year on December 7 in memory of those who lost their lives at Pearl Harbor. Since April 2020, the beacon has been lit each Sunday after sunset through sunrise the next day in response to the coronavirus (COVID-19) pandemic. On a cold, blustery day, the tower provides temporary shelter and warmth while you refuel and prepare for the descent.
From the Summit, head back down Summit Rd to the Lower Summit Parking Lot, but this time, turn left on Summit Trail down to Devil’s Elbow. Make a left at North Peak Trail and enjoy one mile of beautiful, runnable single-track until you arrive at Prospectors Gap (Mile 8.8), where a few trails converge. You can go left on Bald Ridge Trail and head to Eagle Peak. Or go straight and head over to North Peak. For today’s run, I turned left and headed down Prospectors Gap Rd, a fire road that alternates between gentle and steeper slopes (up to 42% grade in some places). You’ll pass Middle Trail and Meridian Ridge Rd, and arrive at another major intersection (Mile 10.6) known as Murchio Gap. This almost 2-mile segment from Prospectors Gap to Murchio Gap is an excellent section to practice downhill running. Here’s an article from one of my favorite running coaches/writers David Roche on How To Run Steep Downhills.

There are 3 options for descending from Murchio Gap — 1) Mitchell Canyon Rd via Meridian Ridge Rd, 2) Eagle Peak Trail, and 3) Back Creek Trail. I chose the last one. Back Creek Trail is a single track trail that meanders alongside Back Creek. It sits in the canyon between Eagle Peak on the west and Meridian Ridge on the east. As such, there are no views like you see from the ridges. But it provides a different and challenging terrain — technical and rocky in parts, like a dry creek bed. For my trail running friends, I suspect this is good training ground for races like the Black Canyon Ultras in AZ. It’s also in my experience, not as well-traveled or crowded as Eagle Peak Trail — I have run this trail for miles without seeing another soul. This area is classic riparian woodland with dense vegetation, so you get to see native plants like California wild grape (Vitis californica), Coyote brush (Baccharis pilularis), Coastal woodfern (Dryopteris arguta), Pipestem clematis (Clematis lasiantha), and more!

At the end of Back Creek Trail, hang left on Bruce Lee Rd, another fire road with towering oak trees, then cross Back Creek onto Coulter Pine Trail (Mile 12.8). Coulter Pine Trail narrows into a single-track that heads toward the foothill meadows and the Clayton Quarry (in the background). Continue onto and descend Oak Rd, make a right at Mitchell Canyon Rd, and arrive back at Mitchell Canyon Staging Area.

You did it!! Now rest and recover, then come back and explore more Diablo trails and ways to summit Mount Diablo!
“Of all the paths you take in life, make sure a few of them are dirt.”
John Muir
#BetterDays
